
Add Printer: Windows cannot connect to the printer. FIXED!


Fix Windows Cannot Connect to the Printer Issue. Easily!


1. Search "Registry Editor"


2. Locate Computer\HKEY_LOCAL_MACHINE\SYSTEM\CurrentControlSet\Control\Print and right-click select New > Key > "DWORD (32-bit) Value"


3. Rename the file to RpcAuthnLevelPrivacyEnabled


4. Right Click select "Modify..."


5. Make sure the Value name is correct "RpcAuthnLevelPrivacyEnabled" Value Data is 0 and the Base is Hexadecimal and click OK.


And now follow the steps below to stop the Print Spooler service and then start it again.

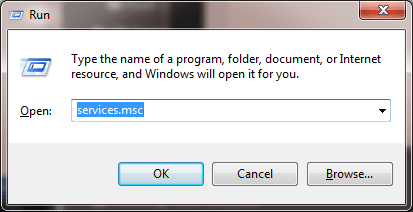
1. Press Win+R (Windows logo key and R key) at the same time. A Run dialog box will open. Type services.msc in the run box and click OK button.


2. In the Name list, locate and double-click on services Print Spooler.


3. Click Restart.


Congratulations! 


Comments

Popular posts from this blog

How to add your Source Code to GitHub

Quick setup  — if you’ve done this kind of thing before  Set up in Desktop or HTTPS SSH Get started by  creating a new file  or  uploading an existing file . We recommend every repository include a  README ,  LICENSE , and  .gitignore . …or create a new repository on the command line echo "# bms" >> README.md git init git add README.md git commit -m "first commit" git branch -M main git remote add origin https://github.com/xxxxxxxxx/bms.git git push -u origin main …or push an existing repository from the command line git remote add origin https://github.com/xxxxxxxxxx/bms.git git branch -M main git push -u origin main -------------------------------------------------------------------------------------------------------- Proper steps to add existing code to GitHub The proper way to push a new project into an existing GitHub repository follows these steps: Create a GitHub repository for the existing project. Copy the GitHub URL for th...

How to connect your Website domain name to a Cloud VPS hosting environment running XAMPP

To connect your Website domain name to a Cloud VPS hosting environment running XAMPP, follow these steps: Obtain Your VPS IP Address : Log in to your Contabo account and navigate to your VPS management section to find your server's public IP address. Configure Your Domain's DNS Settings : Access your domain registrar's control panel. Locate the DNS management section. Create an 'A' record pointing your domain (e.g., yourdomain.com ) to your VPS's public IP address. If you want ' www.yourdomain.com ' to also point to your VPS, add a 'CNAME' record for 'www' pointing to 'yourdomain.com'. Set Up Virtual Hosts in XAMPP : On your VPS, open the httpd-vhosts.conf file located at C:\xampp\apache\conf\extra\httpd-vhosts.conf . Add the following configuration, replacing placeholders with your actual domain and directory paths: <VirtualHost *:80> ServerAdmin [email protected] DocumentRoot "C:/xampp/ht...