How to use ProtonVPN on Linux?
You may Signup or Login your account on ProtonVPN Link: https://account.protonvpn.com/login/
You can set-up VPN for Linux by using the ‘openvpn’ package and with the appropriate config files of the ProtonVPN servers.
As an example, the below Linux VPN setup guide shows how to configure a connection on Ubuntu 16.04LTS.
You can set-up VPN for Linux by using the ‘openvpn’ package and with the appropriate config files of the ProtonVPN servers.
We strongly recommend using our Linux VPN command-line tool which makes it easy to connect on Linux machines
Note: To address frequent DNS leaks on Linux, we’ve updated this guide with new Linux specific config files and new instructions to connect via CLI (see option B below)
Steps to setup VPN for Linux :
1. Install the necessary packages:
Install the OpenVPN package by opening a terminal (press Ctrl + Alt + T) and entering:
sudo apt-get install openvpn- It will prompt you for your password to allow installation, enter it to proceed
- When it prompts you to confirm the installation, press ‘y’ and hit ‘[Enter]’
- If it’s installed already, it will look like this:

Note: if you do not have administrator privileges on your machine, please contact your system administrator and ask them to perform the installation for you.
Install the ‘network-manager-openvpn-gnome’ package, for easier use and compatibility with the Ubuntu Network Manager GUI, by entering:
sudo apt-get install network-manager-openvpn-gnome
And pressing [Y] and then [Enter] to confirm the installation.

Also, ensure that the resolvconf is installed:
sudo apt install resolvconf
2. Get the ProtonVPN config files:
- Download the desired configuration files
- Log into your ProtonVPN dashboard at account.protonvpn.com/login
- Select Downloads on in the left navigation bar
- Find the OpenVPN configuration files section and chose
- Platform: Linux
- Protocol: UDP (recommended) / TCP if you experience slow VPN speeds (this utilizes port 443)
- Click the download icons for the server you wish to download
If you selected “Download All configurations”, extract the zip file to your desired location.

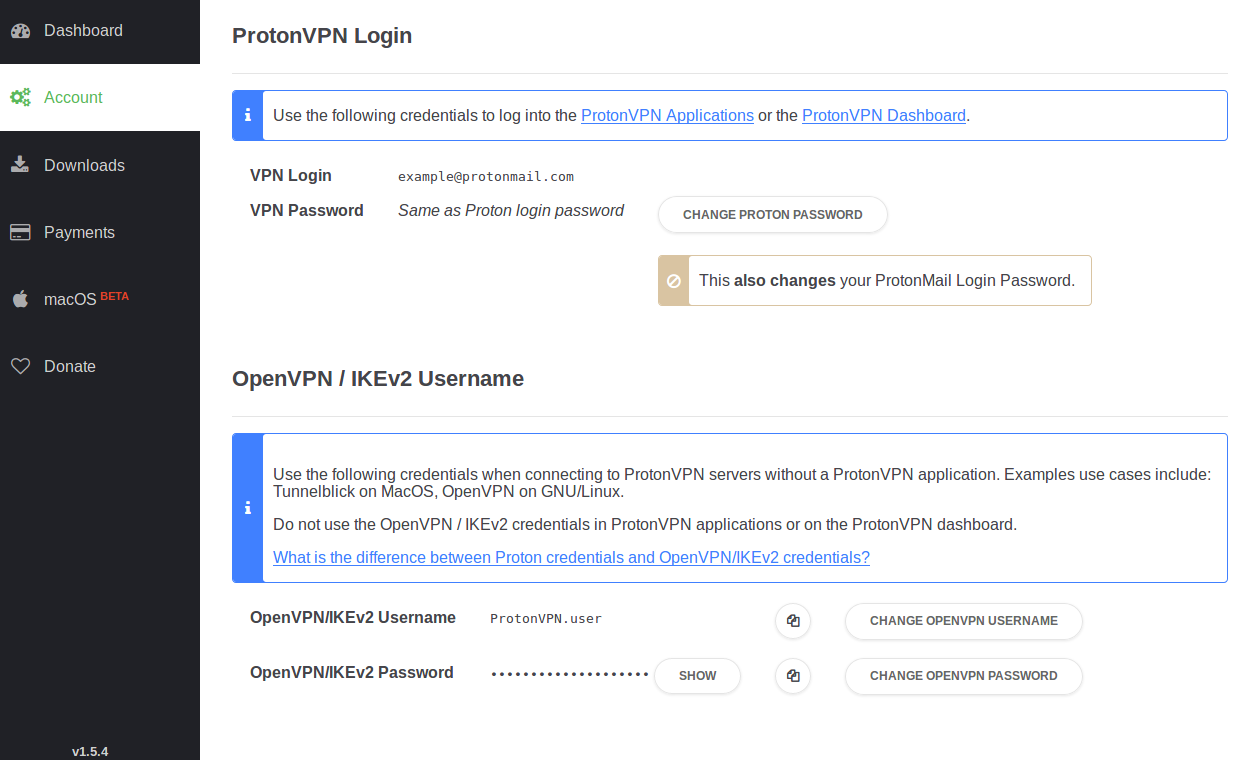
3. Find your OpenVPN credentials:
For increased security, ProtonVPN is set-up with two separate credentials to authenticate a connection.
Log in to the ProtonVPN dashboard and click on Account tab. Here you will see your two type of credentials.
The credentials ProtonVPN Login are used in our applications. OpenVPN / IKEv2 Username is used on manual connections. So please configure the OpenVPN credentials to your preference as you will need to use them to establish a Linux VPN connection.
The credentials ProtonVPN Login are used in our applications. OpenVPN / IKEv2 Username is used on manual connections. So please configure the OpenVPN credentials to your preference as you will need to use them to establish a Linux VPN connection.
Usage
Option A: Linux VPN setup using the Network Manager
Attention: At this point, there is a known issue with DNS Leaks on distributions up to Ubuntu 16.04LTS (and its dependencies and parents). If you find that you too are affected by DNS leaks, we recommend you to use Option B below.
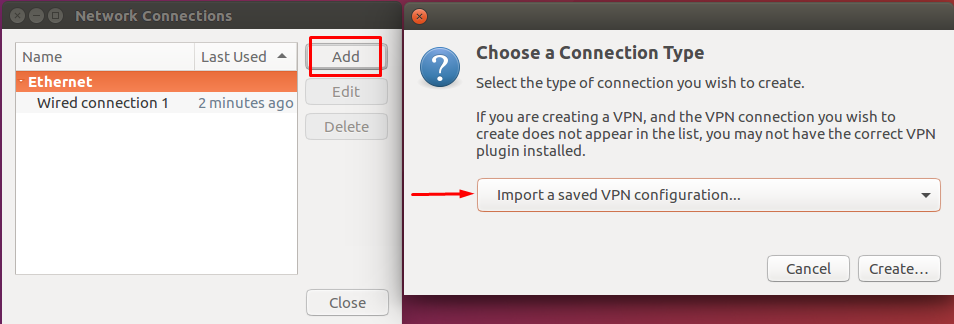
A1. Adding a new connection
- Click on your connection symbol, in the system menu on the top right and select ‘Edit connections’.

Click ‘Add’ in the new window to create a new connection. Select ‘Import a saved VPN configuration…’ in the drop-down menu and click “Create…”
Import the config file of the server you want to connect to, by navigating to the location where you downloaded the configuration file OR extracted the ProtonVPN_config.zip and selecting the desired file.

The files are named with a two-letter abbreviation of the destination country and a number to show which server in that country. For example: de-01 is the first server in Germany; ca-04 is the fourth server in Canada, see this article for a list of abbreviations. Files with two country abbreviations are secure core servers, for example: is-us-01 is the secure core connection over Iceland to the USA. Learn more about our Secure Core feature.
- Enter the OpenVPN credentials from step 3 in the ‘username‘ and ‘password‘ field of the new window and hit save.

For Ubuntu 14.04 LTS: there is an issue specific to 14.04 where importing the configuration that does not read all settings automatically. If you are experiencing issues with the auto-import feature with the network manager, please drop us a line at this link for further instructions.
A2. Establish the Linux VPN connection
Click on your connection symbol in the system menu. Select ‘VPN Connections’, click the entry of your newly added config and it will automatically connect to your chosen ProtonVPN server.

You will see a popup confirming the VPN connection has been established and a lock next to your connection symbol. Congratulations, you’ve just successfully connected to ProtonVPN!

A3: Optional: To add more connections, simply repeat step A1 with a different configuration file(s).
Option B: VPN setup for Linux using the Terminal (CLI)
Note: if you do not have administrator privileges on your machine, please contact your system administrator and ask them to perform the connection for you
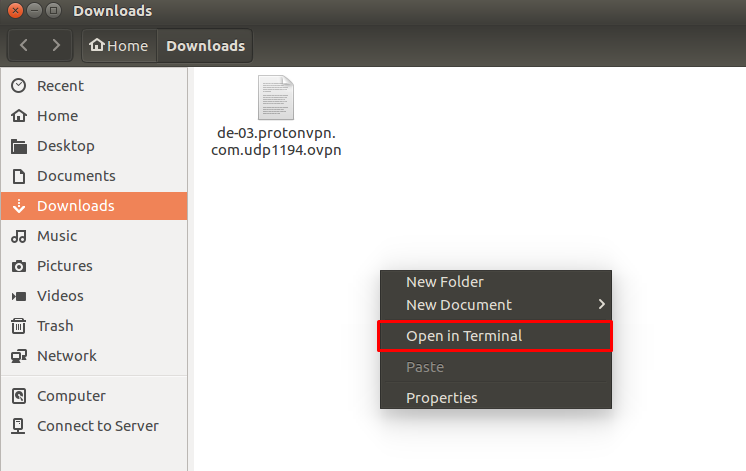
Open a terminal (press Ctrl+Alt+T) and navigate to the folder where you unzipped the config files using
cd <path> . In our example, they are located in ~/Downloads so we enter:cd ~/Downloads
If you find it hard to navigate using CD command line, you can open the folder that the file is located in using any file manager and right click > Open in terminal
Enter the following to initialize a new connection :
sudo openvpn <config.ovpn>
Where <config.ovpn> is the config file name of the server you want to connect to, e.g.
de-03.protonvpn.com.udp1194.ovpn for Germany #3 server. Enter your PC’s administrator password to execute (openvpn will modify your network adapters and needs root privileges)
Subsequently, you will be prompted for your OpenVPN credentials from step 3, enter your credentials to authenticate

- You have finished the Linux VPN setup and successfully connected to the ProtonVPN servers once you see Initialization Sequence Completed
- Keep this Terminal open, to stay connected to ProtonVPN. If you close the terminal, the VPN connection will disconnect.

Click here if you’d like to ensure that the connection is successfully established and there are no leaks.

To disconnect your Linux VPN connection, press Ctrl+C and/or close the Terminal.
Credit: ProtonVPN
PROTONVPN Excellent post. I was checking constantly this blog and I’m impressed! Very useful information particularly the ultimate phase.I handle such info a lot. I used to be looking for this particular information for a very long time. Thanks and best of luck
ReplyDelete