
Increase 512MB Upload Limit for All-in-One WP Migration Plugin

IMPORTANT UPDATE (08/29/2018)
For the instructions outlined in this tutorial to work, you must use version 6.77 or earlier of the All-in-one WP Migration Plugin.
You need to use the old version of All-in-One WP Migration Plugin 6.77 here.

There are 7 steps in this tutorial:

  • 1. Activate Plugin
  • 2. Open Plugin Editor
  • 3. Select Plugin
  • 4. Open Constants.php File
  • 5. Edit Constants.php File
  • 6. Save Changes
  • 7. Test Settings

1. Activate Plugin

all-in-one wp migration unlimited extension free
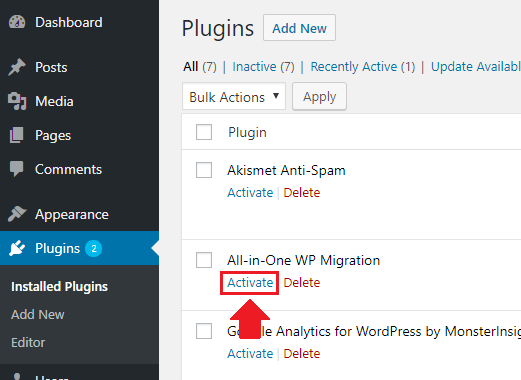
Make sure that your All-in-One WP Migration plugin is activated.

2. Open Plugin Editor

all-in-one wp migration unlimited extension free
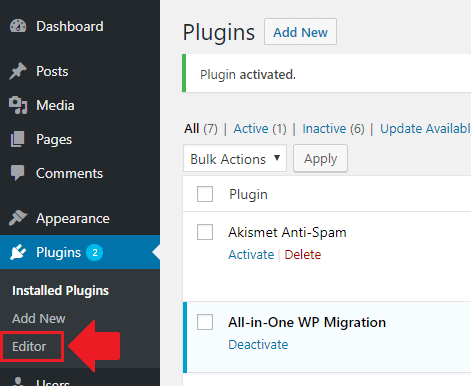
From your WordPress sidebar menu, click on Editor under the Plugins column.

3. Select Plugin

all-in-one wp migration unlimited extension free
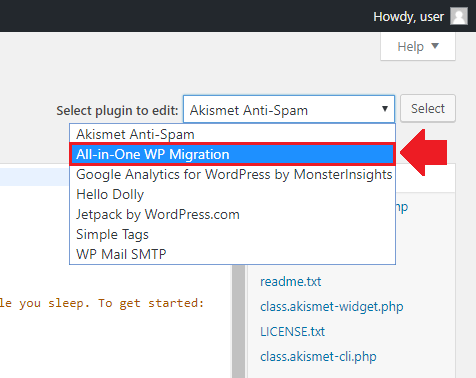
In the upper right-hand corner of the Editor page, select the All-in-One WP Migration plugin.

4. Open constants.php File

all-in-one wp migration unlimited extension free
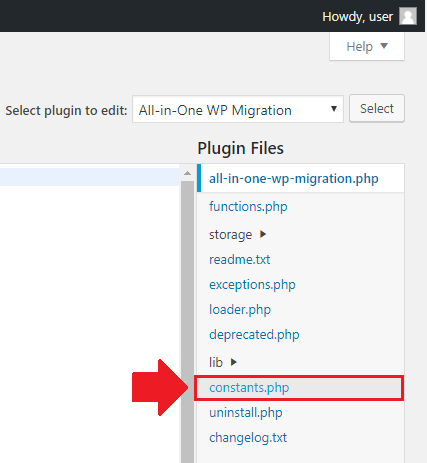
After selecting the All-in-One WP Migration plugin, select constants.php from the list of plugin files.

5. Edit constants.php File

all-in-one wp migration unlimited extension free
Scroll down to line 249 of the constants.php file to the Max File Size section, and add * 20next to the existing number as shown below:
// ================= 
// = Max File Size = 
// ================= 
define( 'AI1WM_MAX_FILE_SIZE', 536870912 * 20 );

6. Save Changes

all-in-one wp migration unlimited extension free
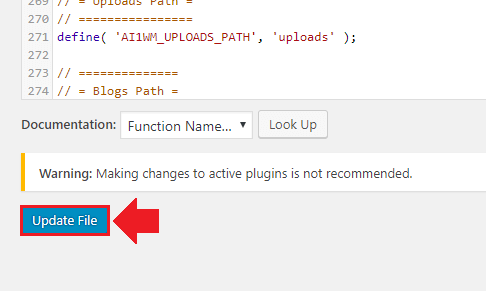
Scroll to the bottom of the page and click on Update File in order to save changes.

7. Test Settings

all-in-one wp migration unlimited extension free
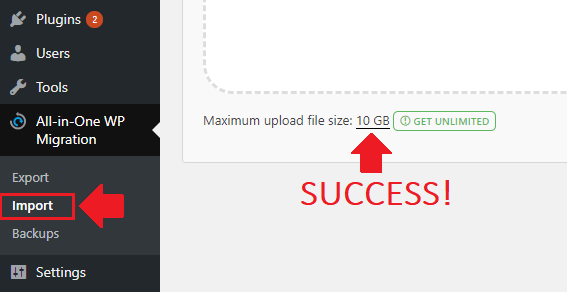
If your changes were successful, you will notice that the maximum upload filesize has been increased to 10GB.

IMPORTANT

Additional Information

If you ever need to increase the upload limit to more than 10GB, simply increase the multiplier. By using a multiplier of 60 instead of 20 (as shown below) you would increase your upload limit to 30GB.
// ================= 
// = Max File Size = 
// ================= 
define( 'AI1WM_MAX_FILE_SIZE', 536870912 * 60 );
Be aware that the upload limit will revert back to 512MB whenever the plugin is updated, so you will need to repeat this tutorial if you ever update the plugin.

Advanced Users

If you prefer to edit the file from outside of WordPress, you can find the plugin’s contants.php file by using the following file path:
/wp-content/plugins/all-in-one-wp-migration/constants.php
For Google Cloud, AWS, and Azure users – use the file paths below to locate your constants.php file.
If you’re using WordPress Bitnami, your constants.php file will be located at:
/opt/bitnami/apps/wordpress/htdocs/wp-content/plugins/all-in-one-wp-migration/constants.php
If you’re using WordPress Click-to-Deploy, your constants.php file is located at:
/var/www/html/wp-content/plugins/all-in-one-wp-migration/constants.php

That’s it!

Credit : www.onepagezen.com

Noted: This is only for personal documentation purposes only.

Comments

Popular posts from this blog

Two simple ways to block internet browsing using Windows Firewall.

  Here are two simple ways to block internet browsing using Windows Firewall. Choose Method A (Block all browsers) or Method B (Block specific browsers like Chrome/Edge/Firefox). ✅ METHOD A — BLOCK ALL INTERNET BROWSING (Recommended) This blocks ALL internet access for ALL applications except those you allow. Steps: Press Windows + R Type: wf.msc Press Enter On the left, click Outbound Rules On the right, click New Rule… Select Custom → Next Under Program , choose All programs → Next Under Protocol and Ports , click Next Under Scope , click Next Under Action , select: ✔ Block the connection Click Next Under Profile , select: ✔ Domain ✔ Private ✔ Public Click Next Name the rule: Block Internet Browsing Click Finish ✔ This will instantly disable ALL internet access. 🟨 OPTIONAL: Allow exceptions If you want to allow EXCEPTIONS (example: allow only MT5, or allow Windows Update): Create a New Outbound Rule Select Program Browse to the app...

Block Browser Using Software Restriction Policy

Here are several alternative ways to block web browsers in Windows (Chrome, Edge, Firefox, etc.) without using the firewall method you mentioned earlier . Choose the method that best fits your need. 1 . Block Browser Using AppLocker (Windows Pro/Enterprise) Blocks the browser application from opening completely. Steps: Press Win + R , type: secpol.msc Go to: Application Control Policies → AppLocker → Executable Rules Right-click → Create New Rule Select: Deny User = Standard user (not Admin) Choose Path : Chrome: C:\Program Files\Google\Chrome\Application\chrome.exe Edge: C:\Program Files (x86)\Microsoft\Edge\Application\msedge.exe Firefox: C:\Program Files\Mozilla Firefox\firefox.exe Apply. Result: User cannot open the browser. Admin still can. 2 . Block Browser Using Software Restriction Policy For Windows Pro. Steps: Press Win + R , type: gpedit.msc Navigate to: Computer Configuration → Windows Settings → Security Settings → Soft...

How to connect your Website domain name to a Cloud VPS hosting environment running XAMPP

To connect your Website domain name to a Cloud VPS hosting environment running XAMPP, follow these steps: Obtain Your VPS IP Address : Log in to your Contabo account and navigate to your VPS management section to find your server's public IP address. Configure Your Domain's DNS Settings : Access your domain registrar's control panel. Locate the DNS management section. Create an 'A' record pointing your domain (e.g., yourdomain.com ) to your VPS's public IP address. If you want ' www.yourdomain.com ' to also point to your VPS, add a 'CNAME' record for 'www' pointing to 'yourdomain.com'. Set Up Virtual Hosts in XAMPP : On your VPS, open the httpd-vhosts.conf file located at C:\xampp\apache\conf\extra\httpd-vhosts.conf . Add the following configuration, replacing placeholders with your actual domain and directory paths: <VirtualHost *:80> ServerAdmin [email protected] DocumentRoot "C:/xampp/ht...