How to change Domain Name Server
(Point to other Hosting Provider) ?
Credit: To the owner of this video.
If you find this helpful just share and comment below. Thank you
(Point to other Hosting Provider) ?
Credit: To the owner of this video.
In this tutorial, you will learn how to change the domain nameservers, also known as pointing the domain to a new hosting provider.
We will use Hostinger platform as an example but the steps can be applied to any domain/hosting provider, only the graphical interface and/or navigation should differ.
In short, to change a domain’s nameservers, you will have to follow these steps:
Before you begin this guide we assume that you already have:
- Access to the control panel of your domain (the place where you purchased your domain).
- Access to your new hosting account.
Step 1 — Get the New Nameserver Values
The first thing you’ll need to do is to find out the list of name servers provided for your new hosting account.
The fastest way to do it is to look for the information in either the email sent to you by your hosting provider when you purchased the account or from the documentation on your hosting provider’s site.
If you have no idea where to get the information, contact your web host and ask them for the “DNS details” or “nameservers” to use for your domain.
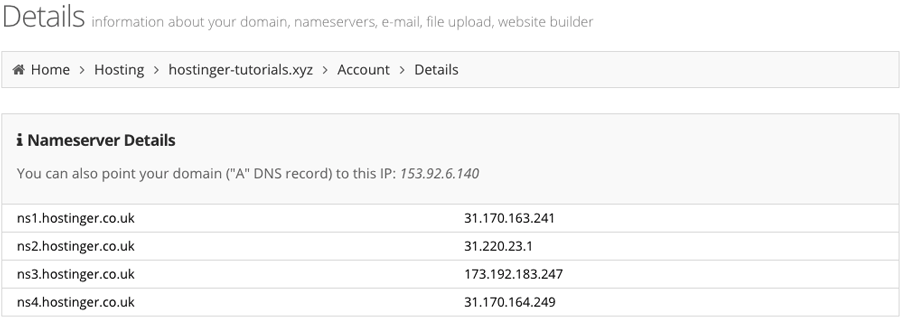
For example, on Hostinger, you can find all DNS related information in the Details section.
The list of name servers will often look like:
ns1.companyname.com
ns2.companyname.com
ns3.companyname.com
ns4.companyname.com
Web hosts usually provide 2 or more nameserver addresses. Note all of them down.
Better still, keep the email or web page containing these names open on your computer so that you can copy and paste them later. You’ll need to enter these values, exactly as given, into your domain registrar’s control panel in the next step.
Step 2 — Apply the New Nameservers Values
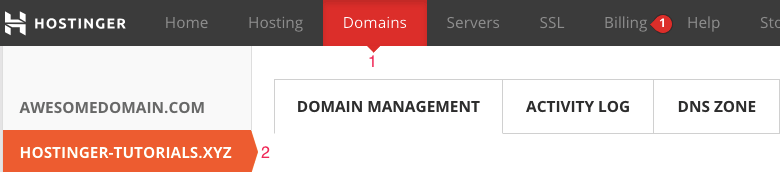
Once you have the list of nameservers, go to your domain name registrar and log into their system. Remember, this is the place where you bought your domain and where your domain management takes place.
When logged in, you will need to look for some option to either set your domain’s name servers or change them. Every registrar has a different way of doing this, and there is no standard method. In general, try the following to get to the page on your registrar’s site that lets you modify the name servers:
- Find a way to list all your domains on the registrar’s site. Sometimes this can be found in a Domains page, or a Domain Manager page or something similar.
- Select the domain for which you want to set the name servers.
- Some registrars have a Set Nameservers menu link or a Manage DNS button. If you see it, that’s probably the one you need to click.
- If the actual nameserver fields are not yet shown, navigate through the page until you find it.
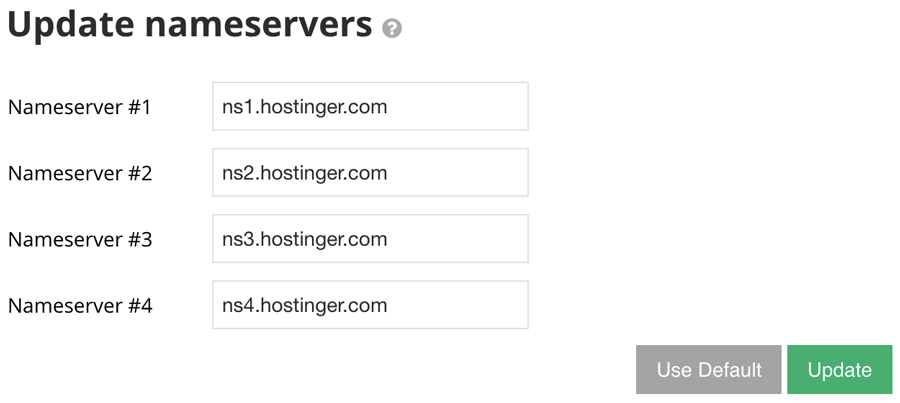
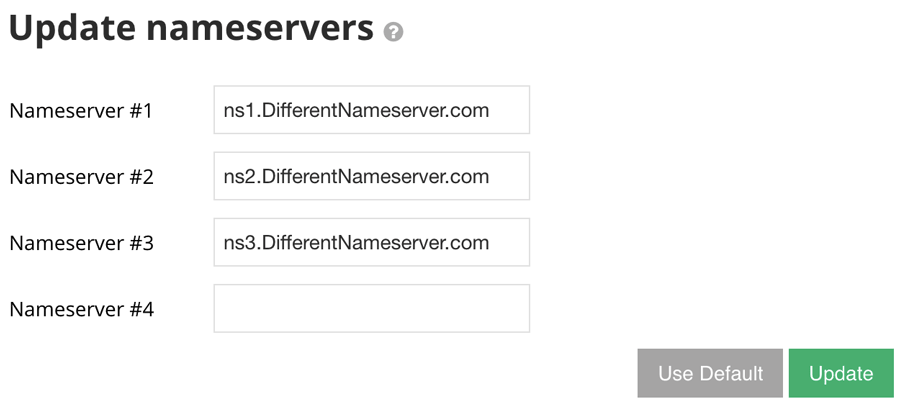
Once you manage to find the correct page to change your nameservers, you will probably see a form that lets you enter things like your Nameserver #1 (or “Primary Name Server”), Nameserver #2 (or “Secondary Name Server”) and maybe even more (like a third and fourth name server as well).
The exact words used may not be the same, but it should mean basically your first name server, second name server, and so on.
Put your first name server from your list, usually, the name beginning with ns1, into the Nameserver #1 field. Then type your second name server, the name beginning with ns2, into the Nameserver #2 field and so on.
A domain name should have at least 2 nameservers associated with it. Some web hosts give you more, others only 2. Some registrars allow you to enter up to 6 names, others only 2.
- If you only have 2 nameservers to enter, but your registrar gives you 6 fields, just enter the first 2 and leave the other fields blank.
- If you have 3 nameservers to enter, but your registrar only allows you to enter 2, just enter the first two.
Don’t worry about the fields you did not get to use or the extra name servers that your web host provided that you could not enter. Your domain will work fine without those extras. They are there to provide a bit of redundancy so that your site will still work if the first name server fails.
If you cannot find the place to set your nameservers, or you don’t want to just blunder around the registrar’s website looking for the correct option to try, look for the “Help” or “FAQ” documentation on your registrar’s site.
At worst, if you are completely lost, write to the registrar support to ask them for help. You can also ask your hosting provider’s help with setting the nameservers in your domain registrar. If you give them your domain registrar control panel access details (login username and password), they should be able to help with no hassle.
Step 3 — Wait for DNS Propagation
Once the nameservers are set, you’re done. You’ll have to wait a bit, though, before you can access your website using your domain name. This period is referred to as worldwide DNS propagation.
Generally, it takes a while, usually from a few hours to sometimes up to 2 or more days for every machine in the world to catch up with the changes.
Flushing DNS cache may speed up the process on your local machine.
Overall, a little patience may be needed here. Once this time period passes, your domain will be ready to use. You can then start building a blog, uploading website files, and conquering the world wide web!
Conclusion
With this tutorial, you have learned how the domain nameserver change procedure is done. By getting the nameservers to be used for your new hosting account and applying them in your domain registrar control panel, you point your domain to a new hosting provider. Once propagated worldwide, full DNS control, as well as your website, will be managed by the new host.
P.S. If you’re trying to point your domain to a VPS, there are a few extra steps that you will need to take.
Credit : www.hostinger.phIf you find this helpful just share and comment below. Thank you
Comments
Post a Comment