Download FreeFileSync App link: https://freefilesync.org/download.php
Install the Application first and for RealtimeSync follow instruction below.
 RealTimeSync
The function of RealTimeSync is to execute a command line each time it detects changes in one of the monitored directories, or when a directory becomes available (e. g. insert of a USB-stick). Usually this command line will trigger a FreeFileSync batch job.
RealTimeSync receives change notifications directly from the operating system in order to avoid the overhead of repeatedly polling for changes. Each time a file or folder is created/updated/deleted in the monitored directories or their sub directories, RealTimeSync waits until a user-configurable idle time has passed in which no further changes were detected, and then runs the command line. This makes sure the monitored folders are not in heavy use when starting a synchronization.
Example: Real time synchronization using FreeFileSync
Start RealTimeSync.exe located in FreeFileSync's installation directory and enter the folders you want to monitor. Instead of doing this manually you can import an ffs_batch file via Menu → File → Open or simply via drag and drop. RealTimeSync will not only extract all directories relevant for synchronization, but will also set up the command line to execute the ffs_batch file each time changes are detected. Now press Start to begin monitoring.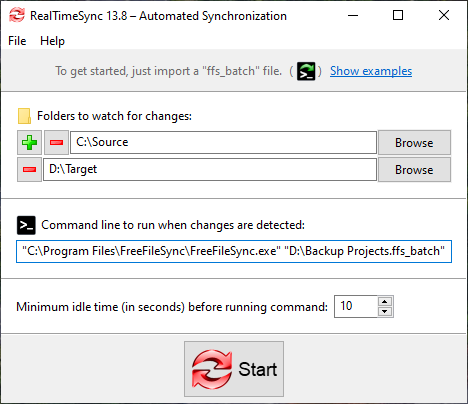
- The command should not block progress. If you call a FreeFileSync batch job, make sure it won't show any popup dialogs. See notes in Command Line Usage.
- RealTimeSync will skip showing the main dialog and begin monitoring immediately if you pass an ffs_real configuration file as the first command line argument to RealTimeSync.exe. This can be used to integrate RealTimeSync into the operating system's auto start:"C:\Program Files\FreeFileSync\RealTimeSync.exe" "D:\Backup Projects.ffs_real"
- You can also pass an ffs_batch file as first argument, which RealTimeSync will automatically convert into a ffs_real configuration with default settings (e.g. 10 seconds idle time).
- RealTimeSync does not require you to start FreeFileSync. It can also be used in other scenarios, like sending an email whenever a certain directory is modified.
Example: Automatic synchronization when a USB stick is inserted
Save an ffs_batch configuration in the USB stick's root directory, e.g. H:\ and let FreeFileSync run it when the stick is mounted. But, instead of hard coding the USB drive letter H:\ (which may change occasionally), refer to the USB stick via its volume name instead.
Configure RealTimeSync as follows:
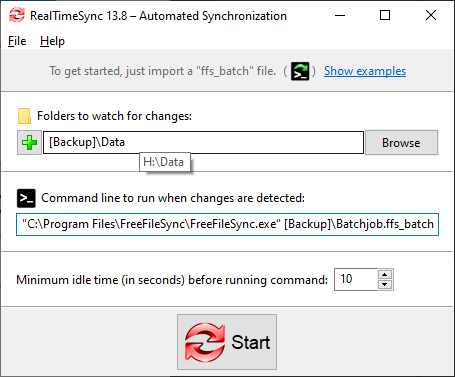
"Backup" is the volume name of the USB stick in our example.
Whenever directory H:\Data becomes available, RealTimeSync executes the command line which starts the batch job located on the stick. RealTimeSync will also trigger each time files are modified in H:\Data.
The full path of the last changed file and the action that triggered the change notification (create, update or delete) are written to the environment variables %change_path% and %change_action%.
They are only visible for the command line that RealTimeSync is executing.
Example: Log names of changed files and directories
Write a list of all changes to a log file: (Windows)
Write a list of all changes to a log file: (Linux/macOS)
Limitations:
- If multiple changes happen at the same time, only the path of the first file is written to variable %change_path%.
- While RealTimeSync is executing the command line, monitoring for changed files is temporarily inactive.
- RealTimeSync relies on receiving change notifications from the operating system. In some cases it just doesn't receive any, e.g. a network path with badly-written/incomplete driver implementation. These buggy drivers often do not fail with an error code, but just do nothing.
The command line usually starts a synchronization task using FreeFileSync which naturally leads to additional file change notifications. Therefore, the RealTimeSync change detection has to be deactivated to not go into an endless loop. On the other hand, it is not likely that changes (other than those from FreeFileSync) happen in first place since RealTimeSync runs the command line only after the user-specified idle time has passed. In any case, files changed during the execution of FreeFileSync will be synchronized the next time FreeFileSync runs.
Comments
Post a Comment