How to Create a Bootable USB Using Rufus
A “bootable USB” is a regular USB storage device (like a USB stick or external hard drive) that has an “ISO image” of an operating system saved on it.
An ISO image is an archive file that contains all the information found on an optical disc, such as a CD or DVD. This could, for example, be a Windows installation CD.
Normally, whenever you start up your computer, it boots from the operating system stored on your internal hard drive. By running the bootable USB however, you can boot up your computer using the USB’s ISO image instead.
This can be useful if you ever need to recover, repair or install an operating system on your computer.
How to Create a Bootable USB using Rufus
Rufus is one of several programs that allow you to create an “ISO image” on a USB stick. To create a bootable USB using Rufus, all you need is:
- Your ISO of choice, e.g. Windows 10
- The latest version of Rufus (available online from https://rufus.ie)
- A spare USB stick (an 8GB USB should be plenty for Windows 10 but make sure you have one that’s large enough for the ISO you’re using)
Once you’ve got these ready, just follow these steps to make your own bootable USB:
Step 1: Open up Rufus and plug your clean USB stick into your computer.
Step 2: Rufus will automatically detect your USB. Click on Device and choose the USB you want to use from the drop-down menu.
Step 3: Make sure the Boot Selection option is set to Disk or ISO image then click Select. Rufus will open a file explorer browser window; locate the ISO image you want to burn onto the USB and select it.

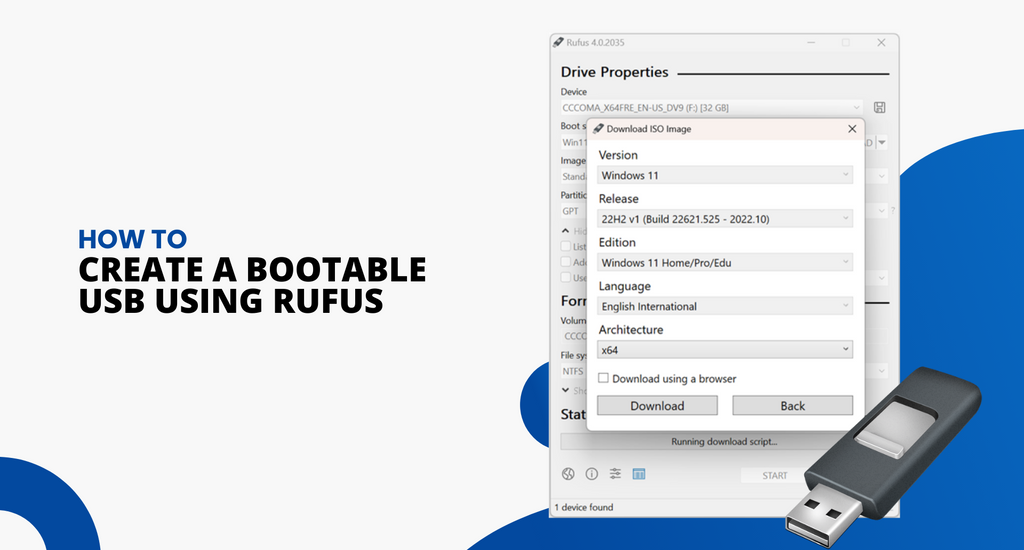
Note: In the latest version of Rufus (3.5), there’s now an option to download the ISO image for Windows 8.1 or 10 directly through Rufus, if you don’t already have a copy saved. Just click on the drop-down arrow next to the Select button and choose Download instead. This will open a dialogue box where you can choose which Windows version you want to download.

Step 4: You’ll generally want to create a Standard Windows installation, and Rufus will automatically detect the correct Partition Scheme based on your device, so keep the default settings as they are. However, you can also change these if you want.
Step 5: Give the Volume label a name of your choice, or leave it as it is, and once again leave the default settings for File system and Cluster size. Now click Start

Note: if the USB you’re using isn’t large enough, you’ll get an error message you letting you know. In this case, you’ll need to start again with a different larger USB.
Step 6: You’ll get a warning saying that any data on the USB will be destroyed (this is normal). Click OK and Rufus will start creating the ISO image on the USB.
Step 7: Once Rufus has finished creating the ISO image on the USB, you can close it and your bootable USB is ready to go!
Summary:
Step 1: Download Rufus
- Go to the Rufus official website and download the latest version of Rufus.
- Rufus is a lightweight, portable tool, so it doesn’t require installation. Simply download and run the
.exefile.
Step 2: Insert Your USB Drive
- Plug in the USB drive you want to use as the bootable device.
- Ensure that the USB has enough storage (at least 8 GB is recommended) and that all important data is backed up, as the process will erase all data on the drive.
Step 3: Open Rufus
- Run Rufus by double-clicking the downloaded file.
- You should see the Rufus interface, which is straightforward and user-friendly.
Step 4: Select Your USB Drive
- Under “Device,” select the USB drive you have inserted.
- Ensure the correct drive is selected to avoid accidentally formatting another drive.
Step 5: Choose Boot Selection
- Click on the “Boot selection” dropdown and choose “Disk or ISO image (Please select).”
- Click on the “SELECT” button to browse your computer and find the ISO file for the operating system you want to make bootable (e.g., Windows, Linux).
Step 6: Configure Partition Scheme
- For most modern PCs, choose “GPT” under the “Partition scheme” and “UEFI (non-CSM)” under the “Target system.”
- For older BIOS systems, select “MBR” under “Partition scheme” and “BIOS (or UEFI-CSM)” under “Target system.”
Step 7: Select File System and Cluster Size
- Ensure the “File system” is set to NTFS (default for Windows) or FAT32 if required for compatibility.
- Leave the “Cluster size” at the default setting.
Step 8: Start the Process
- Click the “START” button to begin the process.
- Rufus may prompt you to download additional files. Click Yes to continue if this occurs.
- A warning will appear about the destruction of all data on the USB. Confirm by clicking OK.
Step 9: Wait for Rufus to Complete
- Rufus will now create the bootable USB. This may take several minutes, depending on the size of the ISO file and the speed of your USB drive.
- Once completed, you’ll see the message READY in Rufus, indicating that the USB drive is now bootable.
Step 10: Eject the USB Safely
- Close Rufus and safely eject the USB drive from your computer.
Step 11: Boot from the USB
- To use the bootable USB, insert it into the target computer.
- Restart the computer and enter the BIOS/UEFI settings (usually by pressing a key like F2, F12, DEL, or ESC during startup).
- Change the boot order to boot from the USB first.
- Save the changes and restart the computer; it should now boot from the USB.
- Get link
- X
- Other Apps
- Get link
- X
- Other Apps
Comments
Post a Comment