
How to access WordPress on a local network


What is a Local Network? 


A local-area network (LAN) is a computer network that spans a relatively small area. Most often, a LAN is confined to a single room, building or group of buildings.

In this tutorial I will teach you on how to access WordPress Website on a Local Network.

You only need to follow the steps that I am going to show you.


STEPS:


1. First and foremost  you need to have an installed XAMPP or any Local Server you prefer.

2. WordPress Website hosted in a Local Server. And Run your WordPress Website.

3. On the Dashboard Click ---> Settings ---> General


Image result for wordpress settings generals dashboard


4.  Now your open Terminal on Ubuntu (CTR+ALT+T) but if you are using windows (windows+R)

---> Type ipconfig then IPv4 Address will appear copy IPv4 Address  for example - 192.168.1.12


Related image


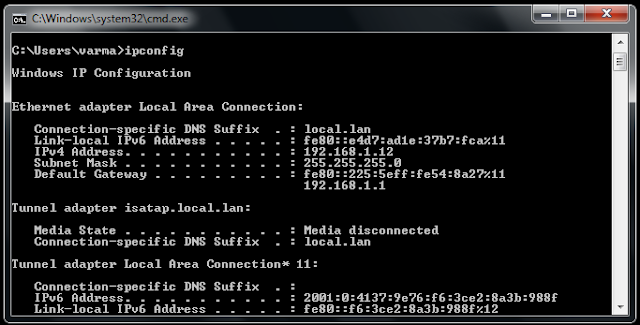
5. Copy IPv4 Address 192.168.1.12

6. Go back to Dashboard / Settings ---> General

7. On WordPress Address (URL) and Site Address (URL) replace word "localhost" with IPv4 Address --> 192.168.1.12 and

    Click SAVE CHANGES.


8. And now try to access on your Browser using the WordPress Address (URL) provided using another devices connected on your network.

If the WordPress Website is still inaccessible, go back review the steps and try to check if you missed something. Thats all.


By: Jaime Moncada
Thank you.


Comments

Popular posts from this blog

Reset 120 day RDS Grace period on 2016 and 2019

  Reset 120 day RDS Grace period on 2016 and 2019 Enter the following command to check Grace Period: wmic /namespace:\\root\CIMV2\TerminalServices PATH Win32_TerminalServiceSetting WHERE (__CLASS !=””) CALL GetGracePeriodDays  Confirm-deletion-of-the-timebomb-key-in-the-registry If you have a home lab environment or another lab where you continually test various solutions, licensing, and trial expiration is a challenge that you constantly tend to run into. It is just part of the fun of lab environments. While most trials are fairly “hard and fast” and don’t allow you to reset the trial expiration, if you work with Microsoft Windows Server and Remote Desktop Services (RDS), there is a “hack” that allows you to effectively reset the expiration of  Remote Desktop  Services grace period where you can essentially rewind the clock on your RDS licensing if you are making use of this role inside your lab environment. I am using Windows Server 2019 for my Windows workloads in...

Remote Desktop Services session timeout Setup in RD Session Host in Windows Servers

  If you face a session time-limit policy issue that gets disconnected in the meantime. You can follow the steps below in order to fix the issue, By default, the user’s RDP session in Windows may stay disconnected until the user or administrator terminates, or the computer is restarted. However, it is quite convenient since a user may connect to his old RDP session and go on working with running programs. In order to terminate disconnected RDP/RDS sessions automatically in a specified time period, you need to set session limits (time-outs) correctly. If you are using an RDS server, you will have to configure session time-out parameters from the RDS collection settings in the Session tab menu. You will have to Specify the time period after which you want to disconnect the RDP session. Lastly, a disconnected session option (by default, a session period is unlimited – Never). Thus, you can set the maximum duration of an active session (Active session limit) and end an idle session (Id...

GitLab Repository Command Line Instructions

Start project repository Command line instructions You can also upload existing files from your computer using the instructions below. Git global setup git config --global user.name "Jaime Moncada" git config --global user.email "jaimemoncadajr@gmail.com" Create a new repository git clone https://gitlab.com/jaimemoncadajr/library-system.git cd library-system touch README.md git add README.md git commit -m "add README" git push -u origin master Push an existing folder cd existing_folder git init git remote add origin https://gitlab.com/jaimemoncadajr/library-system.git git add . git commit -m "Initial commit" git push -u origin master Push an existing Git repository cd existing_repo git remote rename origin old-origin git remote add origin https://gitlab.com/jaimemoncadajr/library-system.git git push -u origin --all git push -u origin --tags Credit :  https://gitlab.com OR Simple Way to Push an existing ...